How to open ports in Zone Alarm Professional
Lawrence Abrams
- November 14, 2006
- Read 123,288 times
Table of Contents
- Introduction
- Opening Ports in Zone Alarm Pro for a particular program
- Opening ports globally in Zone Alarm or Pro
- Conclusion
Video presentation for this tutorial can be found here.
Though Firewalls are necessary when your computer is connected to the Internet, they can cause problems trying to get Internet aware programs working properly. For example, if you wanted to host a game server on your computer, unless you configure your firewall correctly, outside users would not be able to connect to your server. This is because by default a Firewall blocks all incoming traffic to your computer. This causes a problem, because programs that require incoming connections will now not be reachable. To fix this, we need to open the specific Internet port that the program expects to receive incoming connections on. This tutorial will cover how to open specific ports for programs, or to open these ports globally using Zone Alarm.
Opening Ports in Zone Alarm Free or Pro for a particular program
The safest method when opening ports with Zone Alarm is to specify the specific incoming ports you would like allowed on a per program basis. In this method, you actually incoming traffic on certain Internet ports for a particular program rather than globally for any computer. This is safer, because if we allow a specific port for a program, only that program will be allowed incoming access on the port, rather than any program.
A popular question we see in the forums is how to open up ports or port forward in order to get BitTorrent to work with a firewall. For this tutorial we will use as an example how to open up the incoming port for the popular BitTorrent program uTorrent. These methods, though, can apply to any program that requires a specific inbound port to be opened such as games, web servers, applications, etc.
The first step is to determine what port we need to open or port forward to our computer. For uTorrent, we will specify this port by going into the uTorrent program's Preferences and writing down the port shown in the Connection screen as shown in Figure 1 below.

Figure 1. uTorrent Port Settings
Simply write down the port you see in the Port used for incoming connections field, in our example 15697, and make sure the checkbox for randomizing ports is unchecked. Now we know the port we need to allow incoming access to your computer when uTorrent is running. For any other program, you simply need to determine the port it needs for incoming connections and use that number in the following steps. These ports can generally be found by Googling for the name of the program and the word firewall. For example: VNC firewall
To start the process we double-click on the Zone Alarm icon, ![]() , in your task bar to open up the main console screen as shown in Figure 2 below.
, in your task bar to open up the main console screen as shown in Figure 2 below.
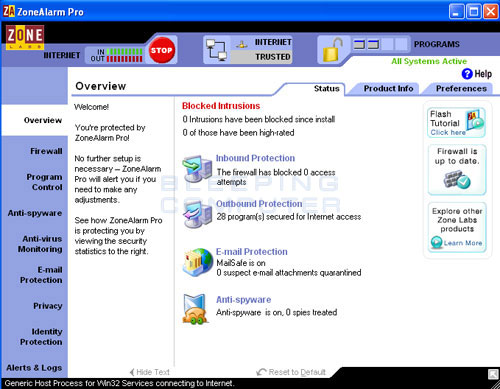
Figure 2. Main Screen of Zone Alarm
Now click on the category in the left navigation bar called Program Control. This will open the program control screen where you can configure how you want Zone Alarm to secure the programs installed on your computer. Once in the Program Control screen, click on the Programs tab and you will see a list of your installed programs and their settings as shown in Figure 3 below.
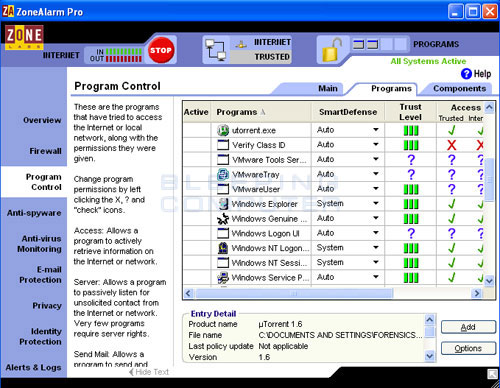
Figure 3. Zone Alarm Program Control Program Listings
In the list of programs find the program we want to allowing incoming access for, and select it by clicking once on the program name in the list. In our example, we are looking for the uTorrent, so we scroll through the list and click once on the utorrent.exe when we find it. We then click on the Options button and in the new screen that opens, click on the Expert Rules tab. This will present you with a screen similar to Figure 4 below.
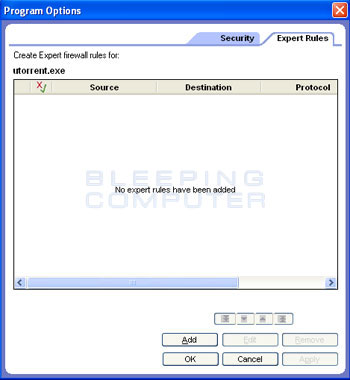
Figure 4. Expert Rule Settings for a program in Zone Alarm
Click on the Add button to start adding the ports that we want to allow incoming access to. When you click on the Add button you will be presented with a screen where you can enter the rule. In the Name field you must provide a name for the rule, like uTorrent, or you will not be able to continue. In the Comments field enter a description of what this rule is going to do. This screen can be seen in Figure 5 below.
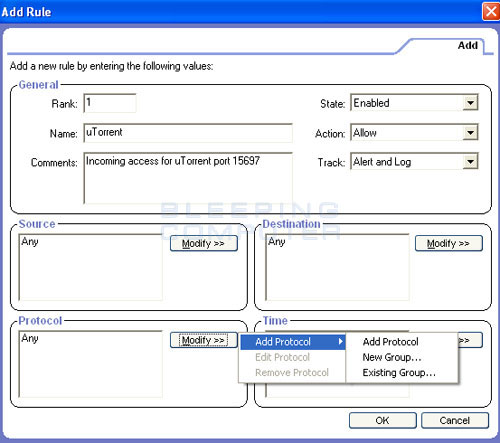
Figure 5. Adding a rule in Zone Alarm
Still in the same screen, click on the Modify button under the Protocol box and select Add Protocol, and then select Add Protocol again as shown in Figure 5 above. You will now be presented with a new screen where you can enter the specific ports you want to allow access.
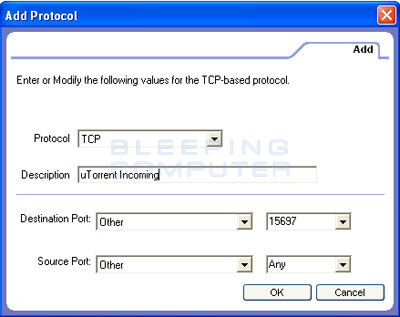
Figure 6. Add Incoming Ports Rule in Zone Alarm
Select the protocol type, in our example it is TCP, enter a Description for the rule in the Description field (this is required to save the rule), change Destination Port to Other, and then enter the incoming ports you want to allow in the field to it's right. Since we only want to allow the one incoming port, 15697, we enter that port. If there was a range of ports we wanted to allow access we could add the range like 15697-15680. This would allow incoming access for all TCP ports between, and including, 15697 and 15680.
When done, simply press the OK button. This will bring you back to the Add Rule page again where you will press the OK button again. You will now be at the Expert Rules page where you will see your new rule listed. To save and activate this rules, press the Apply button and then the OK button.
Now you can close the Zone Alarm console and Zone Alarm will now allow incoming access to these ports when the uTorrent program is running. These steps will work for any other program that requires incoming Internet connections.
Opening ports globally in Zone Alarm Free or Pro
There are times that you want Zone Alarm to allow system wide access to certain ports on your computer, rather than on a per program basis. For example, if you are a developer whose program listens on a particular port, and the name or location of your program keeps changing, then opening the ports your program uses globally makes it easier for you. The steps to accomplish this are very similar to the ones above, but this time you configure these rules via the Firewall screen rather than the Program Control screen.
As the steps are essentially the same as the information provided previously, I will just summarize the steps here instead.
-
Double-click on the Zone Alarm icon in your taskbar to open the main console.
-
Click on the Firewall category in the left hand navigation sidebar.
-
Next click on the Expert tab.
-
Click on the Add button.
-
At the Add Rule screen enter the following information
-
In the Name field enter a name for this rule. (You must enter a name in order to continue)
-
In the Comments field enter a descriptive comment about this rule.
-
In the Name field enter a name for this rule. (You must enter a name in order to continue)
-
Under the Protocol box, click on the Modify button. Then select Add Protocol and then select Add Protocol again.
-
Change the following settings:
-
Set the Protocol to the desired protocol.
-
Enter a description into the Description field. (You must enter a description to continue)
-
Change Destination Port to Other.
-
Enter the port, or range of ports, into the field to the right of the Other field.
-
Set the Protocol to the desired protocol.
-
Press the OK button.
-
Press the Apply button to activate the rule.
- Close the ZoneAlarm console window.
The ports should now be open globally on your computer and can be used by any program that uses these ports.
Now that you know how to allow incoming connections via Zone Alarm, getting programs to work that require incoming access from the Internet should no longer be a problem. Just remember to do your research as to what ports need to be opened for various programs and then simply plug them into your Zone Alarm settings as described above.
As always, if you have question about this tutorial, or about configuring your firewall, feel free to ask about them in the Anti Virus, Firewall and Privacy Products and Protection Methods forum.