How to change the Terminal Services or Remote Desktop Port
Lawrence Abrams
- July 18, 2012
- Read 122,042 times
Introduction
Many organizations that use Remote Desktop Services or Terminal Services are not using a VPN connection before allowing connections to their in-house servers or workstations. If no VPN is required, this means that the Terminal Server or Remote Desktop is publicly visible and allows connections from anyone on the network and in most cases the Internet. This is a major security risk because it allows remote hackers to attempt to use password cracking attacks on your accessible servers in order to gain remote access. As Remote Desktop Services are configured by default to listen on TCP port 3389, all a hacker has to do is scan the Internet for computers that have that port open and then use a cracking program to try and crack the computer's accounts and passwords. This may seem like a hard task, but it is actually not difficult at all using free and publicly available tools.
The process is not only simple but pretty much automated for the hacker. They first use a port scanning tool to scan the Internet for IP addresses that have port 3389 open. They then load this list of IP addresses along with a custom or included user name and password list into the cracking software and let it run. This program runs until its done and then spits out a list of cracked accounts, passwords, and their associated IP addresses. The hacker then takes this information, logs into the remote computers and does what they want, such as encrypting all your data and making you pay a ransom. As you can see, this process may be time consuming, but it's really not hard to do.
Therefore, by changing the port that Terminal Services or Remote Desktop Services listens on, your computer would not show up when they scan IP addresses for 3389. This significantly reduces your chances of having these services remotely hacked. It is not 100% foolproof and VPN services are much more secure, but it definitely goes a long way in securing your Terminal Server or Remote Desktop Server.
This tutorial will explain how to change the port that your Terminal Services or Remote Desktop Services listen on. It will also explain how connect to these services through the Remote Desktop Client using a custom port.
How to change the Terminal Server or Remote Desktop listening port
The port setting for Remote Desktop Services is found in the Windows Registry. In order to change this setting we will need to change the PortNumber value in the following key:
HKEY_LOCAL_MACHINE\SYSTEM\CurrentControlSet\Control\Terminal Server\WinStations\RDP-Tcp
To change the port, click on the Windows Start button and type Regedit in the search field and then press Enter on your keyboard. If you are in Windows XP, you will have to click on the Run button before typing. Once you press enter, the Registry Editor screen will appear as shown below.
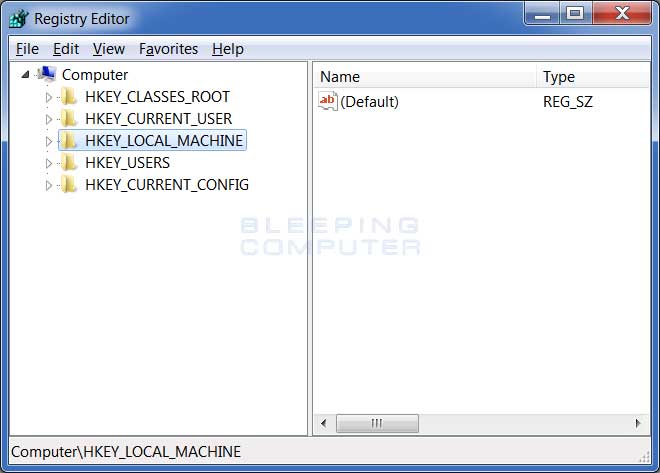
Windows Registry Editor
Navigate to the HKEY_LOCAL_MACHINE\SYSTEM\CurrentControlSet\Control\Terminal Server\WinStations\RDP-Tcp key and when there left click once on the RDP-Tcp key in the left pane. In the right pane of the windows you will now be presented with a list of values that are under this key. Scroll down on the right until you see the PortNumber value as shown below.
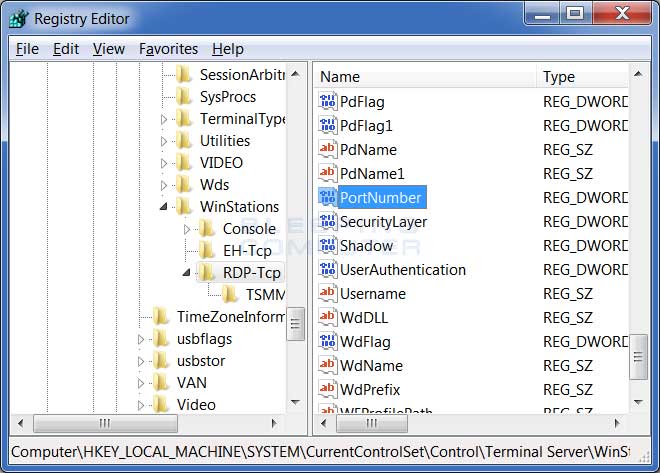
PortNumber Value
Now double-click on the PortNumber value and you will be shown a small dialog where you can change its value. When the dialog opens, it will be configured to show you the hexadecimal equivalent of the port number. As it easier to use decimal numbers, select the Decimal radio selection under the Base category. The dialog box should now be similar to the one below.
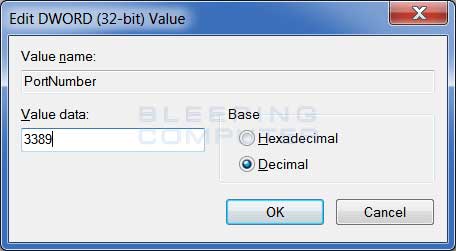
Edit the PortNumber Value
Type the new port number that you would like to use instead of 3389 in the Value data field and then press the OK button. You can now close the Registry Editor program.
You now need to reboot your computer in order for the changes to go into effect.
Your Remote Desktop Services or Terminal Server is now configured to use the new port that you entered.
How to connect to a Terminal Server or Remote Desktop that is using a custom port
When you use the Remote Desktop Client to connect to a remote computer it will automatically attempt to make the connection on port 3389. If you are connecting to a computer that uses a custom Remote Desktop Services port you must specify the custom port as part of the address you are connecting to. To do this, you simply add a colon followed by the port number to the IP address or host name you are connecting to. For example, if you were connecting to the host rd.example.com and it used a custom port of 8178, you would need to specify rd.example.com:8178 as the computer you are connecting to.
Examples of a Windows and Mac Remote Desktop Client connecting to a remote port are show below:

Windows Remote Desktop Client
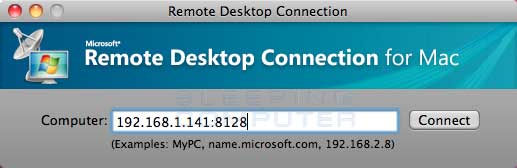
Mac Remote Desktop Client
As you can see in the above pictures, you specify the port as part of address by using a colon.
You should now know how to connect to a Terminal Server or Remote Desktop Server that is using a custom port.


