How to create a new user account in Windows 7 and Windows Vista
Lawrence Abrams
- February 24, 2009
- Read 903,588 times
Windows 7 and Windows Vista allows you to have multiple users sharing the same computer under their own individual accounts. This allows each individual user to have their own location on the computer where they can store their personal documents, pictures, videos, saved games, and other personal data. This also allows the owner of the computer to assign certain accounts the ability to perform administrative tasks like installing software, while limiting other user's abilities.
This tutorial will walk you through creating a new account in Windows 7 and Windows Vista.
-
Click on the Start button. This is the small round button (
) in the lower left corner of your screen that has a Windows flag on it.
-
Click on the Control Panel menu option.
-
When the control panel opens you will see a screen similar to Figure 1 below.
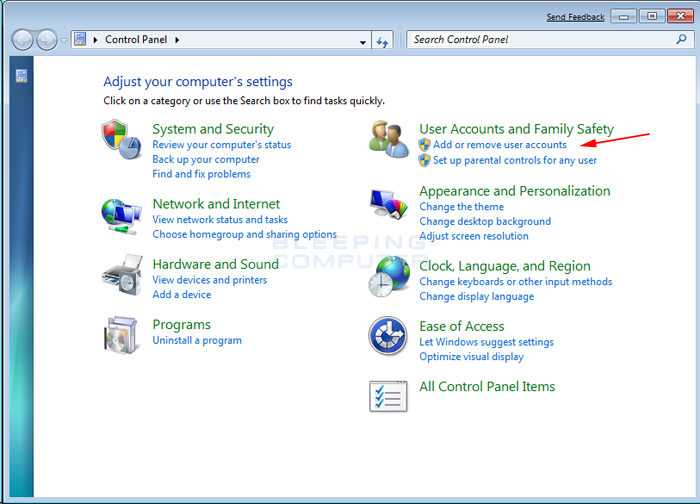
Figure 1. Windows 7 Control Panel
-
Click on the Add or remove user accounts control panel option as shown by the red arrow in figure 1.
-
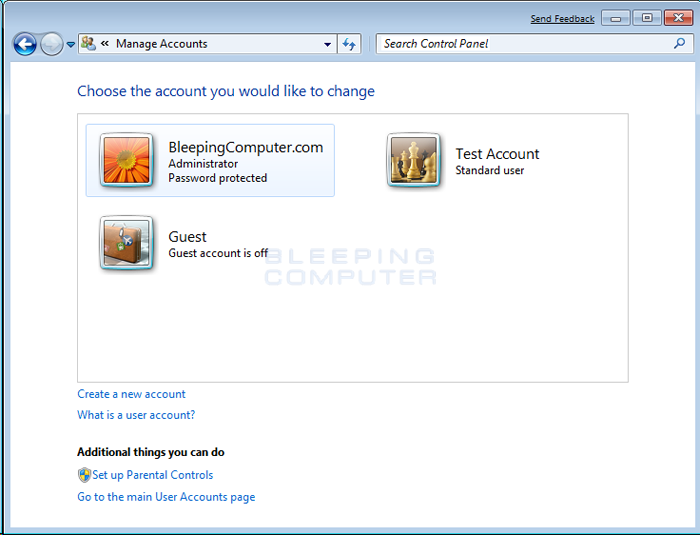
You will now be in the Manage Accounts control panel as shown in Figure 2 below.

Figure 2. Manage Accounts screen in Windows 7
This screen shows all the accounts currently on your computer. To create a new account, click on the Create a new account option as shown by the red arrow above.
-
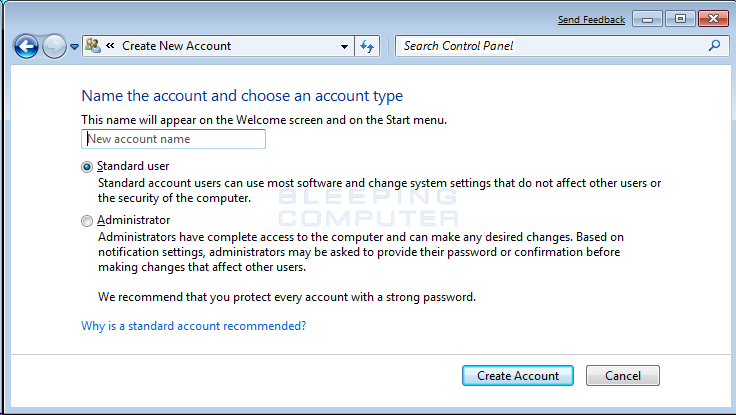
You will now be at the Create New Account screen.

Figure 3. Create New Account screen
In the New account name field enter the name of the new account that you would like to create. This could be a person's first name, full name, or whatever other designation you would like to give. You then need to decide which of the two types of accounts you would like to create. An Administrator account has full access to the computer and can make all changes, install software, and create and delete accounts. The other type of account is Standard user and has limited privileges as to what settings and changes it can make to the computer. It is suggested that for all users, you set them as a Standard User account and have one administrator account that you can logon to as needed. This will protect your computer from malware and other harmful activities.
When you have finished selecting a name and the type of account you wish to setup, you should click on the Create Account button.
-
Your new account will have been created and you will see it listed in the Manage Accounts screen.
Figure 4. New user has been created
As you can see our new user, named Test Account, has been created.
Now when you start Windows 7 or Vista, you will see the additional account listed in the logon screen. That user can then select their login name and login into their profile so they can access their private data.
If you have any questions about this tutorial please feel free to post them in our Windows 7 forums.


